This article describes step-by-step
process of setting up the my site infrastructure in the SharePoint Farm.
Lets Start...
Setting up the Host
The first
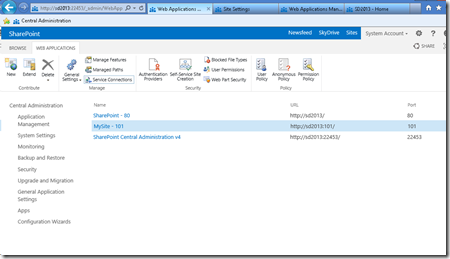
step us to go create (according to the best practices) own web application for
hosting my sites. Go to the central administration, Application management,
“Manage web applications”

And
create a dedicated web application (You can do it on existing web App too)

Create a
site collection in the root of the newly created web application.
Site
Collection must have “2013” experience and use “My Site Host” template.

After
Site Collection has been created, click on the “Managed Paths” in the web
application that you created to host My Sites.

Add a new
managed path with wildcard inclusion. I prefer to use “my” as the My Site
managed path, but you can of course pick up anything else.

The next
thing is to check service connections for the Web Application which will host
my sites. Click on the “Service Connections” button to…
..see if
right service applications are set up.

Now it’s
time to set up the self service site creation. Go back to the Web application
management, chose the application that you created to host My Sites, and click
on the “Self Service Site Creation” button.

Click
“On” in the “Site Collections” radio box, and enter your managed path in the
“Start a Site” field (with “Prompt users to create a team site under” chosen)

Next step
is to grant users permission to create new site collections (for my sites).
Click on the “Permission Policy” button in the Web Application management, with
the web application which hosts the my sites selected.

In
the”Manage Permission Policy Levels”, click on the “Add Permission Policy
Level”

Call it
however you want (“MySite Subsite Creation” in my case), and grant the “Create
Subsites” permission.

Now, the
new permission policy level should appear among other policy levels…

And we
need to grant that policy level to the users. Click on the “Users Policy”
button in the Web Application management, with the web application that you
created to host My Sites selected…

Click on
the “Add users” link…

From all
zones…

And
select the users which you want to have rights to create my sites. On my case,
it will be “Everyone”.

Select
your newly created policy level…

And now
you should see “Everyone” with the new policy selected.
Set up the my sites.
Go to the Central Administration –> Application Management, and
select “Manage service applications”.

Then
select the “User Profile Service Application”
In the
“User Profile Service Application”, click on “Setup My Sites”

This is
where you need to set up the search center, my host location (in this case – root
site collection of the Web Application that serves as the host) and personal
site location (managed path within the host web application – “my” in my case).
Take a look at the screenshot for all the other fields (which I have used in my
case):

Set up the timer job for activity feed.
Go to the
Central Administration –> Monitoring –>Timer Job –> Review job
definitions

Find the
“User Profile Service Application – Activity Feed Job”, and set up the activity
feed sync timer according to your needs.

All set up
Go to any SharePoint page and try the About me option under your logged in name and you will be taken to your own mysite
Saravjeet Lamba
SharePoint 2013 | MySites | Configuration | Setup |